
In today world, most of us work long hours in offices or in front of computers or we sit with phone in arm.
Unfortunately, this inactivity can damage our posture and we can get number of health problems.Mental and emotional health, also our physical condition are all impacted by poor posture.However, there is a solution – yoga. By incorporating Yoga for Posture Correction into your daily routine, you can correct bad posture and experience the numerous benefits it brings.
The Impact of Bad Posture
Sitting for prolonged periods can have serious repercussions on our bodies.It not only has an impact on our posture, but it also adds to a variety of physical and mental health difficulties.. The negative impacts of a sedentary lifestyle go beyond the strain on our eyes. Poor posture can lead to back pain, cardiovascular problems, digestion issues, and even the alteration of the natural curve of the spine. Moreover, slouching can change how others perceive us and impact our mood and self-esteem. The good news is that yoga provides a holistic approach to reducing these negative consequences and restoring balance to our bodies and thoughts.
Yoga: A Powerful Solution
Yoga is a powerful tool that can counteract the harmful effects of sitting and help correct bad posture. One category of yoga poses that specifically addresses hunched backs and rounded shoulders, commonly caused by excessive sitting, is heart openers. By incorporating heart-opening poses into your yoga practice, you not only correct your posture but also experience emotional healing, increased self-confidence, and a greater sense of abundance.
Practice These 14 Yoga Poses to Correct Bad Posture
1. Tadasana for bad posture
Tadasana, also known as Mountain Pose, serves as the fundamental cornerstone for achieving and maintaining good posture. This simple yet powerful pose has the ability to realign your body, enhance your posture, and bring a sense of groundedness and stability. In this article section, we will explore the essence of Tadasana and guide you through the steps to perform it correctly, allowing you to unlock the transformative benefits of this foundational yoga pose.

Image by yanalya on Freepik
The Foundation of Tadasana:Start by standing with your feet hip-width apart, ensuring a stable and balanced foundation.Ground through all four corners of your feet, distributing your weight evenly.Engage your leg muscles, creating a strong and steady base.Feel the connection between your feet and the earth, establishing a sense of rootedness.
Lengthening the Spine:As you stand tall, visualize a gentle lengthening of your spine, allowing each vertebra to stack upon the other.Draw your tailbone downward, promoting proper alignment and reducing any excessive curvature in the lower back.Lift the crown of your head upward, as if a delicate string is gently pulling you towards the sky.Feel a gentle elongation through your entire spine, creating space and openness.
Roll Your Shoulders Back:Bring awareness to your shoulders and consciously roll them back, releasing any tension or slouching.Broaden your collarbones and open up your chest, creating a sense of expansion and confidence.This action not only improves your posture but also allows for better breathing and circulation.
Relax Your Arms by Your Sides:Let your arms hang naturally by your sides, with your palms facing inward.Soften your shoulders and allow your arms to feel light and effortless.This relaxed position promotes a sense of ease and balance throughout your entire body.
Aligning Head to Toe:With your body in a tall and upright position, ensure that your head is aligned with the rest of your body.Avoid jutting your chin forward or tilting your head to either side.Imagine an invisible thread gently pulling the crown of your head upward, creating a sense of vertical alignment.
Embracing Deep Breaths and Stillness:Take slow, deep breaths as you hold the Tadasana pose.Allow the breath to flow naturally, filling your lungs with fresh energy and oxygen.Stay in the pose for 5-10 breaths, experiencing a sense of stillness, presence, and inner awareness.
2. Unlock Spinal Length and Openness with Wide Leg Forward Fold
Wide Leg Forward Fold, also known as Pasarita Pattondandasana, offers a beautiful opportunity to elongate your entire spinal column while providing a nourishing stretch for your shoulders and chest. In this article section, we will explore a variation of Wide Leg Forward Fold that involves interlacing your fingers behind your back, allowing for an enhanced shoulder and chest opening.

Image by yanalya on Freepik
How to Practice Wide Leg Forward Fold: Fingers Interlaced Variation
Preparation and Setup:Start in a standing position with your feet slightly wider than hip-width apart, creating a stable foundation.Find a comfortable distance between your feet, typically around four feet apart. Adjust the width based on what feels good in your body.Take a moment to ground yourself, finding balance and stability through your feet.
Interlacing the Fingers:Reach your arms behind your back and interlace your fingers, creating a secure grip.As you interlace your fingers, ensure that your palms are facing inward.Take a deep inhalation to lift your gaze, expanding your chest towards the ceiling. Feel the opening in your shoulders and the activation of your upper back.
Forward Fold and Shoulder/Chest Opening:Exhale gently and fold forward from your hips, maintaining the interlaced fingers position.Allow your arms to hang overhead, extending toward the floor. Feel the gentle traction and lengthening in your shoulders, chest, and spine.If the interlaced fingers position becomes uncomfortable, you can use a yoga strap to achieve a similar stretch with less intensity. Simply hold the strap behind your back, keeping your arms extended.
Staying in the Pose:Find a steady and comfortable position in the forward fold, allowing your upper body to surrender and relax.Take slow and deep breaths, directing your breath into the areas that feel tight or restricted.Remain in the pose for approximately 30 seconds, experiencing the gentle release and opening in your spine, shoulders, and chest.
Returning to Standing:Engage your core muscles and inhale deeply as you lift your upper body, maintaining a straight back.Slowly rise back to a standing position, bringing your arms to your sides and releasing the interlaced fingers.Take a moment to notice the effects of the pose, feeling the newfound length and openness in your spine.
Practicing Wide Leg Forward Fold with the fingers interlaced variation can be a transformative experience for your body and mind. As you lengthen your spinal column and open your shoulders and chest, you create space for increased flexibility and vitality. This pose can help relieve tension in the upper body, improve posture, and enhance overall health.
3. Improve Your Posture with Downward Facing Dog (Adho Mukha Svanasana)
Downward Facing Dog is a highly beneficial yoga pose that targets the entire body, providing both stretching and strengthening benefits. Begin on your hands and knees, with your wrists precisely under your shoulders and your knees under your hips. Here’s how to practice Downward Facing Dog:

Image by yanalya on Freepik
• Start on your hands and knees, aligning your wrists specific under your shoulders and your knees and under your hips.
• Place your toes in and start lifting your hips toward the ceiling, straightening your legs as much you can.
• Press your palms firmly into the mat, distributing the weight evenly between your hands and fingers.
• Lengthen your spine by gently drawing your tailbone toward the ceiling and reaching your heels toward the floor.
• Relax your neck and let your head hang naturally between your arms.
• Focus on taking deep, steady breaths throughout the pose, allowing your breath to guide you into a state of relaxation.
• Hold the pose for 5-10 breaths, or longer if you feel comfortable. As you feel more comfortable with the posture, you can gradually extend your hold.
• Downward Facing Dog is an excellent pose for promoting flexibility, building upper body and core strength, and increasing blood circulation. This yoga pose helps to relieve stress and calm the mind.
4. Cow Face Arms: Enhance Your Flexibility and Posture
Cow Face Pose, or Gomukhasana, is a yoga posture that offers numerous benefits for the body and mind. One specific variation of this pose, known as Cow Face Arms, focuses on stretching and opening the shoulders, chest, and arms. It can be easily practiced anytime, anywhere, making it an ideal stretch for those with a busy lifestyle or limited mobility. Whether you’re at your desk, sitting on the couch, or taking a break during your workday, Cow Face Arms can provide a rejuvenating stretch to help release tension and promote better posture.
How to Practice Cow Face Arms

Image by yanalya on Freepik
Find a Comfortable Seated Position: Be sure you’re in a position where you can keep your balance and feel calm, while you’re sitting in a chair or on the floor.Ground down through both feet if you’re in a chair, or find a comfortable seated position on the floor.
Lift the Right Arm Skyward:Begin by lifting your right arm up toward the ceiling, reaching as high as you comfortably can.This movement helps elongate the side body and create space in the shoulder joint.
Bend the Right Elbow and Reach Down Your Back:Slowly bend your right elbow, bringing your right hand down your back. Aim to reach as far down as possible without straining.This action helps to stretch the triceps and the back of the shoulder.
Wrap the Left Arm Behind Your Back:Next, wrap your left arm behind your back, reaching the left fingers up toward the right fingers. The goal is to connect the hands together, but if they don’t touch yet, no worries! There are alternatives.

Image by Racool_studio on Freepik
Use a Yoga Strap (Optional):If you’re unable to clasp your hands together, you can use a yoga strap, belt, or scarf to bridge the gap between your hands.Hold onto the prop with both hands and use it as an extension to connect the two sides.This modification allows you to experience the benefits of the pose while gradually working toward greater flexibility.
Draw the Elbows Back and Lift the Chest:As you settle into the pose, draw the elbows gently back to deepen the stretch in the shoulders and chest.Lift the chest and open the heart, maintaining an upright posture.Take deep, conscious breaths as you hold the pose, allowing the breath to create space and relaxation.
Hold for 5 Breaths and Switch Sides:Stay in Cow Face Arms for about 5 breaths, or longer if it feels comfortable for you. Afterward, release the pose and switch sides.Lift the left arm overhead, bending the elbow and reaching the left fingers down your back.Wrap the right arm behind your back, reaching the right fingers up toward the left fingers. Repeat the same steps on this side, focusing on maintaining balance and alignment.
By regularly practicing Cow Face Arms, you can experience increased shoulder and chest flexibility, improved posture, and a release of tension in the upper body.
5. Unlock Shoulder Relief and Improve Posture with Thread the Needle Pose
Thread the Needle Pose is a beneficial yoga posture that specifically targets the shoulders and offers relief for those struggling with bad posture. This posture can help relieve discomfort and stiffness in the back, shoulders, and neck, either you’re a novice or an experienced yogi. In this article section, we will explore the steps to practice Thread the Needle Pose and delve into its remarkable benefits for your upper body and overall posture.

Image by yanalya on Freepik
How to Practice Thread the Needle Pose:
Starting Position:Begin on all fours in a tabletop position, aligning your wrists under your shoulders and your knees under your hips.Ensure a stable foundation by grounding your palms firmly into the mat, spreading your fingers wide for added support.Relax your neck and gaze down towards the floor, allowing your head to align with your spine.
Thread the Needle:Inhale deeply as you reach your right arm towards the ceiling, extending it upward.Exhale slowly and thread your right arm underneath your left arm, sliding it along the mat until your right shoulder and cheek rest comfortably on the floor.Extend your left arm forward, placing your palm on the mat in front of you, maintaining stability and balance.
Twist and Release:Allow your upper back to gently twist as you relax and surrender to the pose.Feel the stretch in your right shoulder and across your upper back as the twisting motion helps release tension.Breathe deeply and consciously, directing your breath into the areas that feel tight or restricted.
Switch Sides:After holding the pose for several breaths, gently release and return to the starting tabletop position.Take a moment to realign your spine and regain stability.Repeat the same steps on the opposite side, threading your left arm underneath your right arm, and experiencing the beneficial stretch on the other side of your body.
By incorporating Thread the Needle Pose into your yoga practice, you can gradually improve your posture and enhance overall upper body mobility. This pose serves as a potent tool for releasing tension, increasing flexibility, and fostering a sense of health.
6. Seated Spinal Twist: A Restorative Pose for Correcting Bad Posture
Seated Spinal Twist is a gentle yet powerful yoga pose that helps alleviate the effects of bad posture and promotes spinal alignment. This restorative posture offers a soothing stretch to the spine, releases tension in the back muscles, and improves overall posture and flexibility. In this article section, we will guide you through the steps to practice Seated Spine Twist effectively, ensuring a safe and beneficial experience.

Image by yanalya on Freepik
How to Practice Seated Spinal Twist for Improved Flexibility and Posture
Seated Spine Twist is a beneficial yoga pose that promotes flexibility, releases tension, and enhances overall posture. By incorporating this pose into your regular practice, you can experience the revitalizing effects it has on your spine and body. In this article section, we will guide you through the steps to practice Seated Spine Twist effectively, ensuring proper alignment and maximum benefits.
Image by Freepik
Preparation for Seated Spinal Twist
Find a Comfortable Seated Position: Begin by sitting on the floor with your legs extended in front of you. Ensure that your spine is tall and upright, creating a stable foundation for the pose.
Support with Your Hands: Place your hands on the floor behind you, fingers pointing away from your body. This hand placement provides support and stability throughout the pose.
Entering the Seated Spinal Twist
Bend the Left Knee: Bend your left knee and place your left foot flat on the outside of your right knee. The left knee should be pointing upward, creating a stable base for the twist.
Lengthen Your Spine: Inhale deeply, elongating your spine from the base to the crown of your head. Feel the energy and extension throughout your entire back.
Twist Your Torso: On the exhale, initiate the twist by gently rotating your torso to the left. Engage your core muscles to support the movement and maintain stability.
Place Your Right Elbow: As you twist, bring your right elbow to the outside of your left knee. The pressure of the elbow against the knee assists in deepening the twist.
Maintaining the Seated Spinal Twist
Find Balance: Balance the twist by keeping your sitting bones grounded and both hips evenly planted on the floor. This stability allows for a safe and effective twist.
Lengthen and Align: Continue lengthening your spine on each inhale, creating space between the vertebrae. On each exhale, deepen the twist by gently rotating your torso further to the left.
Breathe Mindfully: Maintain steady and conscious breathing throughout the pose. Each breath should be deep, smooth, and connected, allowing for relaxation and release.
Exiting the Seated Spine Twist
Release the Twist: To exit the pose, slowly unwind the twist by bringing your torso and head back to center with control and awareness. Maintain the length in your spine as you return to the starting position.
Repeat on the Other Side: For a balanced practice, repeat the entire sequence on the other side. Bend your right knee and twist your torso to the right, following the same steps and maintaining proper alignment.
By regularly practicing Seated Spine Twist, you can improve your spinal flexibility, relieve tension in the back, and cultivate better posture.
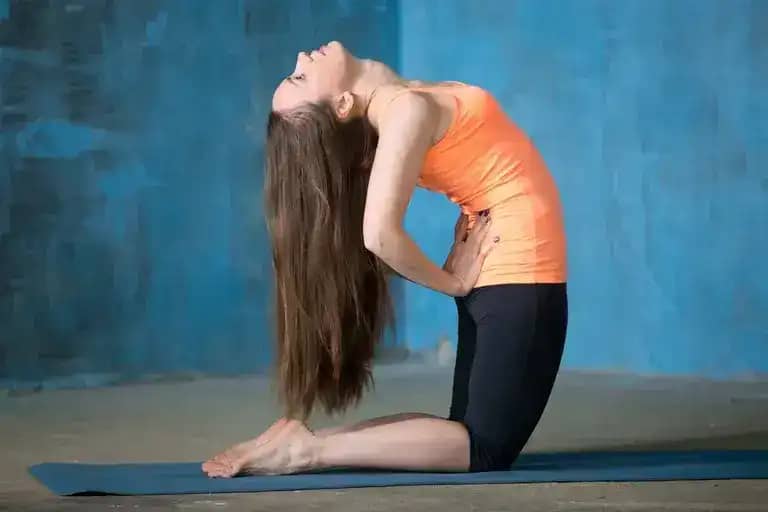
7. Open Your Heart and Release Tension with Camel Pose
Camel Pose, also known as Ustrasana, is a powerful backbend that helps counteract the effects of prolonged sitting and hunching over desks or computers. By practicing Camel Pose, you can release tension in the chest, shoulders, and throat, while opening your heart center. In this article section, we will explore the technique and variations of Camel Pose to help you experience its rejuvenating benefits.
How to Practice Camel Pose: Two Variations
Variation 1:
Protecting the Lumbar Spine: Start by kneeling on the mat with your toes tucked under and lengthen up through the crown of your head. Place your palms on your lower back, fingers pointing down, to provide support and protection for the lumbar spine. Press your hips forward, lift your heart, and gently arch your upper back while keeping your thighs active and your shoulders relaxed away from your ears. Hold this position for three deep breaths, allowing the stretch to gradually deepen. To release, slowly come out of the pose, returning to a neutral kneeling position.

Image by yanalya on Freepik
Variation 2:
Deepening the Backbend: Begin in the same kneeling position as in Variation 1. After completing Variation 1, continue by reaching one hand at a time back towards your heels. If possible, grab hold of your heels with your hands. Press your hips forward, maintain activation in your thighs, and deepen the arch in your upper back. Keep your shoulders relaxed and away from your ears, allowing your heart to shine forward and your throat to open. Hold this position for three more breaths, feeling the stretch expand through your entire front body. After a few rounds of Camel Pose, return to a neutral kneeling position and take a breath before transitioning into Child’s Pose to release the spine.
Practicing Camel Pose regularly can have a transformative effect on your posture and overall well-being. By undoing the habitual hunching and rounding of the upper body, this backbend helps restore balance, flexibility, and openness. It stretches the front body, including the chest, abdomen, and hip flexors, while also strengthening the back muscles.

8. Relieving Bad Posture with Child’s Pose: A Step-by-Step Guide
Child’s Pose, also known as Balasana, is a restorative yoga posture that can help alleviate the negative effects of bad posture. By practicing this pose regularly, you can release tension in the back, shoulders, and neck while promoting relaxation and rejuvenation.

Image by yanalya on Freepik
Start on your hands and knees: Begin by positioning yourself on a comfortable yoga mat, on your hands and knees. Ensure your wrists are aligned beneath your shoulders, and your knees are hip-width apart.
Spread your knees wide: Open your knees as wide as your mat, allowing for a comfortable stance. Keep the tops of your feet resting on the mat while ensuring that your big toes touch each other. This posture creates a stable base for the pose.
Lower your torso and root your forehead: Lower your belly between your thighs, gently resting it on the mat. As you do so, root your forehead to the floor. Relax your shoulders, jaw, and eyes. If resting your forehead on the floor feels uncomfortable, you can place it on a block or stack two fists to find a suitable level of support. It’s important to find a comfortable position for your forehead to activate an energy point between the eyebrows, stimulating the vagus nerve and promoting a “rest end digest” response.
Choose your arm position: There are several options for arm placement in Child’s Pose, allowing you to customize your experience:
Stretch your arms forward: Extend your arms in front of you, reaching towards the top of the mat. Keep your palms facing down towards the floor. This variation promotes a gentle stretch in the shoulders and arms.
Bring your arms back: Alternatively, you can bring your arms back alongside your thighs. Position your palms facing upwards. This variation provides a sense of grounding and openness.
Try a shoulder release: For a deeper shoulder release, bend your elbows and bring your palms together, touching the back of your neck. Slowly inch your elbows forward, allowing a gentle opening in the upper back and shoulders.
Find your breath and relax: Stay in Child’s Pose for as long as you like, allowing yourself to reconnect with your breath. Take slow, steady inhales and exhales, focusing on deepening your relaxation with each breath. Feel the gentle stretch along your spine and the release of tension in your body.
Child’s Pose is a nurturing posture that helps counteract the effects of bad posture. By regularly incorporating this pose into your yoga practice, you can promote a healthier alignment, release tension, and experience a deep sense of relaxation.
9. How to Do Locust Pose (Salabhasana) for Correcting Bad Posture
Locust Pose, also known as Salabhasana, is a rejuvenating yoga pose that can help improve your posture and strengthen your back muscles. By practicing this pose regularly, you can alleviate the negative effects of a sedentary lifestyle and promote a healthy spine alignment. Let’s explore how to perform Locust Pose step by step:

Image by yanalya on Freepik
Lie down on your stomach: Start by lying flat on your stomach on a comfortable yoga mat. If desired, you can place a blanket under your hips for added padding, which enhances comfort during the pose. However, if you are performing Locust Pose as part of a flowing sequence, you may skip using a blanket.
Position your arms and legs: Extend your arms alongside your body, palms facing downwards. Simultaneously, stretch your legs straight out behind you, ensuring the tops of your feet are in contact with the mat. This starting position prepares your body for the pose.
Prepare your upper body: To open your chest and create a solid foundation, bring your forehead or chin to the mat. Roll your shoulders back and down, allowing your chest to expand and your shoulder blades to slide down your back. This posture promotes a healthy spine alignment and counteracts the effects of slouching.
Lift your upper body and engage your legs: Inhale deeply, and as you exhale, begin to lift your head, chest, and arms off the floor simultaneously. Keep your arms straight behind you, reaching through all ten fingers. Rotate your hands so that your thumbs point downwards, enhancing the engagement of your back muscles. Slide your shoulder blades down your back for optimal alignment.
Engage your legs and maintain alignment: Activate your leg muscles, lifting your knees off the floor.
10. Improving Posture with Sphinx Pose (Salamba Bhujangasana): A Step-by-Step Guide
Sphinx Pose, also known as Salamba Bhujangasana, is a gentle backbend that can help alleviate the effects of bad posture. By practicing this pose regularly, you can strengthen your back muscles, open up your chest, and improve your overall posture. Let’s explore the step-by-step instructions for performing Sphinx Pose:

Image by yanalya on Freepik
Begin by lying down on your front: Find a comfortable spot on your yoga mat and lie down on your stomach. Ensure your legs are extended straight behind you, with the tops of your feet resting on the mat.
Align your shoulders over your elbows: Place your elbows directly under your shoulders, creating a 90-degree angle with your forearms. Your forearms should be parallel to each other, palms facing down on the mat. This alignment sets a solid foundation for the pose.
Roll your shoulders back and slide your shoulder blades down: As you settle into the pose, gently roll your shoulders back and away from your neck. This action helps open up your chest and create space in the front of your body. Slide your shoulder blades down your back, feeling a subtle lift in the breastbone area.
Focus on your breath: Direct your breath towards your lower back and abdomen. As you inhale, imagine expanding your lower back, allowing the breath to flow into that area. This conscious breathing helps enhance the benefits of the pose and promotes relaxation.
Hold the pose and breathe: Stay in Sphinx Pose for several breaths, allowing your body to settle into the posture. Maintain a steady and smooth breath, feeling the gentle stretch in your abdomen, chest, and lower back. With each exhale, you can release any tension or tightness you may be holding.
Coming out of the pose: When you’re ready to exit the pose, slowly bring your elbows to the sides, lowering your upper body towards the mat. Rest your forehead on your hands or on the mat, creating a comfortable position to release any strain from your neck and shoulders.
11. Seal Pose: Unlocking Better Posture Step by Step
Seal Pose is a beneficial yoga pose that can help improve posture and alleviate the effects of bad posture. By practicing this pose regularly, you can strengthen your back muscles, release tension in the lower back, and promote a healthier alignment of the spine. Let’s explore the step-by-step instructions for performing Seal Pose:

Image by Freepik seal pose
Begin by lying on your stomach: Find a comfortable space on your yoga mat and lie down on your stomach. Allow your legs to rest a comfortable distance apart, providing stability and support.
Place your palms flat on the floor: Bring your hands next to your shoulders and press your palms firmly into the mat. Adjust the distance of your hands away from your body based on the sensations in your lower back. If you experience discomfort, bring your hands slightly forward. If you need more space, widen the position of your arms to accommodate your shoulders.
Choose your neck position: In Seal Pose, you have options for your neck position. You can keep your neck in a neutral position, aligning it with your spine. Alternatively, you can gently drop your head back or forward, depending on your comfort level. If desired, you can support your chin with your fists for added support and stability.
Relax your buttocks and hold the pose: Allow your buttocks to relax and soften into the mat. Hold the pose for a duration of 3 to 5 minutes, gradually working your way up to holding it for up to 20 minutes. During this time, focus on deep, steady breaths and allow your body to release any tension or tightness.
Exiting the pose: To come out of Seal Pose, gently lower your chest back onto the floor and lie down. Rest your forehead on your hands, creating a moment of relaxation and grounding.
Deepen the release in the lower back (optional): For a deeper release in the lower back, you can incorporate a variation of the pose. Bend one knee and glide it toward the hip, avoiding a parallel position. Bring your cheek onto your hands, gazing toward the bent knee. Take a few breaths in this position and then repeat on the other side.
12. Unlocking Strength and Flexibility: A Guide to Bridge Pose
Bridge Pose, also known as Setu Bandha Sarvangasana, is a powerful yoga posture that offers numerous benefits for the body and mind. This backbend variation strengthens the lower body, opens the spine and neck, and promotes a sense of rejuvenation. Whether you’re a beginner or an experienced practitioner, Bridge Pose can be modified to suit your individual needs. Let’s explore the step-by-step instructions for practicing Bridge Pose:

Image by yanalya on Freepik
Find your foundation: Begin by lying on your back with your palms facing down and your arms resting alongside your body. Bring the soles of your feet to the mat, keeping your knees bent. Ensure that your feet are positioned close to your fingers and are hips-width apart.
Lift your hips: On an inhale, press down firmly through the soles of your feet and your hands, and lift your hips toward the sky. As you lift, engage your glutes and legs to create stability and support. Take a moment to find balance and alignment in this elevated position.
Hold and breathe: Stay in Bridge Pose for three deep and steady breaths. Allow your breath to guide your movements and encourage a sense of relaxation and openness in your body. Feel the stretch and expansion in your chest, shoulders, and hip flexors as you hold the pose.
Release with control: On an exhale, gently lower down one vertebra at a time, ensuring a controlled and gradual descent. This mindful release allows your spine to return to its neutral position and provides a gentle release for the muscles.
Deepen the backbend (optional): If you feel ready for a deeper backbend experience, you can explore variations in subsequent rounds. In the second round, you have the option to clasp your hands behind your back and roll your shoulders underneath, enhancing the stretch in your chest and shoulders. Remember to listen to your body and only go as far as feels comfortable for you.
Explore your practice: In the third round, you can choose to repeat either of the first two options or stick with the initial variation. Honoring your body’s needs and limitations is essential in any yoga practice.
Windshield wiper knees: After completing three rounds of Bridge Pose, take a moment to release any remaining tension in your spine. Lie on your back and gently sway your knees from side to side, resembling the motion of a windshield wiper. This movement promotes relaxation and helps restore balance to your body.
13. Relax and Restore: A Guide to Supported Legs Up the Wall Pose
Supported Legs Up the Wall, also known as Viparita Karani, is a rejuvenating yoga pose that offers a wide range of benefits for the body and mind. This gentle inversion helps to relieve stress, reset the spine, enhance blood circulation, and reduce inflammation in the legs. By incorporating Supported Legs Up the Wall into your practice, you can experience deep relaxation and restoration. Let’s explore the step-by-step instructions for practicing this pose:

Photo by Thirdman
Find your position: Begin by sitting with your side close to a wall. It’s important to have a clear space where you can comfortably extend your legs against the wall.
Slide and recline: Lean back onto your hands and gently slide the back of your legs up the wall. Slowly recline onto your back, allowing your feet to face the ceiling. Take your time to find a position that feels comfortable and supportive for your body.
Close the gap: Once you are in the reclined position, make any necessary adjustments to inch your seat closer to the wall. The aim is to eliminate any space between your hips and the wall, creating a stable and secure foundation for the pose.
Find your hand placement: You have two options for your hand placement during Supported Legs Up the Wall. You can either rest your hands on your belly, providing a comforting and grounding sensation, or you can spread your arms out to a “T” shape with your palms facing up, inviting a sense of openness and surrender.
Relax and let go: Close your eyes and allow your body to relax completely. Release any tension or holding in your muscles and surrender to the support of the pose. Focus on your breath and let it guide you into a state of deep relaxation.
Stay in the pose: Remain in Supported Legs Up the Wall for three to five minutes, allowing yourself to fully immerse in the benefits of the pose. Use this time to let go of stress, tension, and fatigue, and simply enjoy the tranquility of the moment.
14. The Blissful Relaxation of Savasana: A Guide to Final Resting Pose
Savasana, also known as Corpse Pose, is the ultimate relaxation posture that brings a sense of deep tranquility and rejuvenation to the body and mind. After an invigorating yoga practice, taking the time to fully surrender in Savasana allows you to integrate the benefits of your practice and experience profound relaxation. Let’s explore the step-by-step instructions for practicing Savasana:

Image by yanalya on Freepik
Find a comfortable position: Begin by lying down on your back on a yoga mat or a comfortable surface. Make sure you have enough space to stretch out fully.
Create space in your legs: Separate your legs slightly, allowing your feet to naturally fall open to either side. Release any effort in holding your legs straight, allowing them to relax and soften.
Position your arms: Bring your arms alongside your body, a few inches away from your torso. Turn your palms to face upwards, allowing your fingers to gently curl in a relaxed manner.
Support your shoulders: Tuck your shoulder blades onto your back to provide support and stability. This subtle movement helps to release tension in the shoulders and promotes a sense of ease.
Let go and relax: Once you have positioned your limbs, release any effort from holding them in place. Let your entire body relax and surrender to the ground. Allow your body to feel heavy and sink into the mat.
Natural breath awareness: Allow your breath to flow naturally without trying to control or manipulate it. If your mind wanders, gently bring your attention back to the sensation of your breath, observing it without trying to deepen or alter it.
Embrace the stillness: Stay in Savasana for a minimum of five minutes, but ideally aim for ten minutes or longer if you have the time. To prevent the urge to keep checking the time, set a gentle alarm or timer.
Awakening from Savasana: When you are ready to conclude your practice, begin by gradually deepening your breath. Slowly start to wiggle your fingers and toes, gradually reawakening your body from its state of deep relaxation.
Full body stretch: Stretch your arms overhead, reaching from your hands to your feet. Enjoy the revitalizing sensation of a full body stretch, awakening your muscles and energy.
Transition to a fetal position: Bend your knees and gently roll over to one side, keeping your eyes closed. Use your bottom arm as a pillow and rest in a fetal position for a few breaths. This transitional posture helps to integrate the experience of Savasana before returning to an upright position.
Return to a seated position: With the support of your hands, slowly come back up into a comfortable seated position. Take a moment to feel the effects of Savasana lingering in your body and mind.
FAQ Page about Best 14 Yoga Poses – Yoga for Posture Correction
What is the impact of bad posture on our bodies and overall health?
Bad posture, particularly caused by prolonged sitting, can lead to various physical and mental health difficulties. It affects our posture, adds strain on our eyes, and can result in back pain, cardiovascular problems, digestion issues, and even the alteration of the natural curve of the spine. Additionally, slouching can impact how others perceive us and affect our mood and self-esteem.
How can yoga help in correcting bad posture?
Yoga is a powerful tool that can counteract the harmful effects of sitting and assist in correcting bad posture. Specifically, heart-opening yoga poses are beneficial for addressing hunched backs and rounded shoulders caused by excessive sitting. By incorporating these poses into your yoga practice, you not only correct your posture but also experience emotional healing, increased self-confidence, and a greater sense of abundance.
Can yoga improve mental and emotional health along with physical condition?
Yes, yoga is known to have a positive impact on mental and emotional well-being in addition to improving physical condition. Through regular practice, yoga helps reduce stress, anxiety, and depression. It promotes relaxation, mindfulness, and inner peace, fostering a sense of overall balance and well-roundedness.
How can incorporating Yoga for Posture Correction into a daily routine be beneficial?
Incorporating Yoga for Posture Correction into your daily routine offers numerous benefits. By consistently practicing yoga, you can gradually correct your bad posture and improve your overall body alignment. This leads to reduced pain and discomfort, enhanced flexibility, increased muscle strength, and improved balance. Additionally, maintaining good posture helps boost confidence and portrays a positive image to others.
Are there specific yoga poses recommended for correcting bad posture?
Yes, there are specific yoga poses that are particularly effective in correcting bad posture. Some of these poses include Cobra Pose (Bhujangasana), Bridge Pose (Setu Bandhasana), Cat-Cow Pose (Marjaryasana-Bitilasana), Fish Pose (Matsyasana), and Mountain Pose (Tadasana). These poses target different areas of the body, such as the back, shoulders, chest, and neck.